![ChatGPT source code in Python [Update 2024]](/_next/image?url=https%3A%2F%2Fpub-6260987aa5e84a04b470576604a2f319.r2.dev%2Fblog-images%2F1791291504211-Chat-Gtp-source-code-in-python-1.jpg&w=1920&q=75)
ChatGPT is the most famous product of OpenAI. OpenAI is an artificial intelligence research organization where we can train machine learning models.
In this article, I share information on how to create ChatGPT source code in Python.
What is ChatGtp?
Before knowing the ChatGPT source code in Python, you must know What is ChatGTP? ChatGPT is an artificial intelligence (AI) chatbot that answers your questions and generates human-like text based on the input it receives.Here are the key aspects of the ChatGPT source code:-
Key Features:
- Natural Language Understanding and Generation
- Pre-trained Model
- Generative Model
ChatGPT source code
Requirements:
To make this ChatGPT chatbot using Python, you must follow these points:
- Python 3.x installed on your computer
- A text editor or IDE
- An OpenAI API key. Sign up for a free API key on the OpenAI website
Find the OpenAI API key here: https://platform.openai.com/account/api-keys
Required Modules:
We have to install the ‘OpenAI’ library using Python.
Also, we need a ‘tkinter’ library.
To install the libraries, open a terminal or command prompt and run the following command:
pip install openai
Code Implementation:
import openai
Apply the API Key
openai.api_key = "ENTER_YOUR_API_KEY"
If you want to create a functional in ChatGTP Modules for a response, then make sure that you have the following:
# Here we share to Generate a response using OpenAI GPT-3 def generate_response(prompt): completions = openai.Completion.create( engine="text-davinci-002", prompt=prompt, max_tokens=1024, n=1, stop=None, temperature=0.5, )
message = completions.choices\[0\].text
return message
In the next process, we’ll write a chatgtp function to display the response in a GUI interface
# GUI interface def display_response(): input_text = input_field.get() response = generate_response(input_text) output_field.config(state='normal') output_field.delete(1.0, tk.END) output_field.insert(tk.END, response) output_field.config(state='disabled')
- The Tkinter library is used to create GUI interfaces.
- The window is created using the tk.Tk() method and is named root.
- The root.title method is used to set the title of the window, and the root.
- The geometry method is used to set the size of the window.
Finally, the root.mainloop() method starts the main loop of the GUI interface.
ChatGPT source code:
# If you find coding projects & digital marketing support at papayacoders.in import tkinter as tk import openai
Apply the API Key
openai.api_key = "YOUR_API_KEY"
Generate a response using OpenAI GPT-3
def generate_response(prompt): completions = openai.Completion.create( engine="text-davinci-002", prompt=prompt, max_tokens=1024, n=1, stop=None, temperature=0.5, )
message = completions.choices\[0\].text
return message
GUI interface
def display_response(): input_text = input_field.get() response = generate_response(input_text) output_field.config(state='normal') output_field.delete(1.0, tk.END) output_field.insert(tk.END, response) output_field.config(state='disabled')
Create the main window
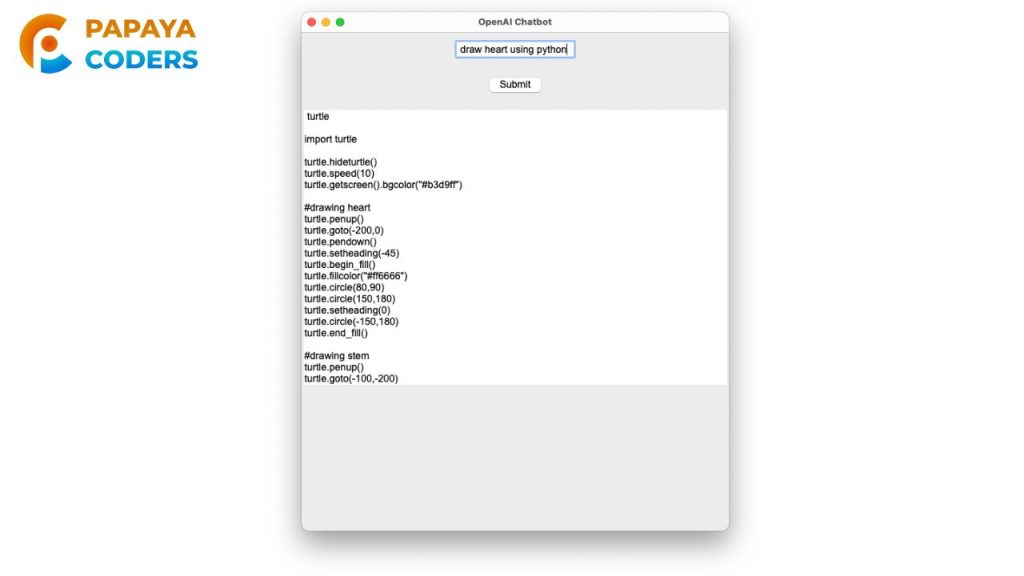
root = tk.Tk() root.title("OpenAI Chatbot") root.geometry("600x700")
Create the input field
input_field = tk.Entry(root, font=("Arial", 14)) input_field.pack(pady=10)
Create the submit button
submit_button = tk.Button(root, text="Submit", font=("Arial", 14), command=display_response) submit_button.pack(pady=10)
Create the output field
output_field = tk.Text(root, font=("Arial", 14), state='disabled') output_field.pack(pady=10)
Start the GUI event loop
root.mainloop()
OUTPUT:
Conclusion:
If you find creative solutions to drive brand awareness and lead generation, then let's connect with Papaya Coders Private Limited. You can grow your company by contacting us online or by calling us at +916392806939 today!
If you like this, then you must know: ChatGPT source code in Python SEO or Yoast? Post, then comment, and share your opinion with us. In my previous blog on Building the Best App for Your Business, I ended the post by linking to one of our final guides.